Titanium iOS KeyChain support with Securely

I’m happy to announce the the availability of the Securely Titanium module.  The goal of Securely is to provide a security toolkit for Titanium developers to write more secure apps.

KeyChain Properties API

The first release of Securely (iOS only) provides a Properties API which provides access to the iOS KeyChain.  Designed for ease of use the Properties module should be familiar to anyone using Titanium as it mimics the popular Ti.App.Properties API.

var securely = require('bencoding.securely');
Ti.API.info("module is => " + securely);

//You can provide optional identifier and accessGroup 
//If none are provided we will use your bundle id as the identifier
var properties = securely.createProperties({
     identifier:"Foo",
     accessGroup:"Bar"
});

Since the Securely Properties module mimics Ti.App.Properties you simply call setString when you would like to save a value.  Instead of being written to Properties it is instead persisted to the device’s KeyChain.

properties.setString('String','I am a String Value ');

Similarly you use the getString method just like you would for properties, but instead you are retrieving values from the KeyChain.  We even support default values for API compatibility.

Titanium.API.info('String: ' + properties.getString('whatever',"Fred"));

All of your other Ti.App.Properties you rely upon also have a compatible equivalent in Securely.  To see the full list please read our documentation here.

Get the module

The module is available at benahrenburg/Securely on github.

Need an example?

The module’s example folder contains a sample app.js demonstrating all of the available methods.  You can view the sample in on github here.

Learn more

To learn more please visit the Securely github repo and read the documentation.

What’s next?

I am currently working on adding Encryption and File Handling features to Securely.  An Android version is also in the planning stages.

Using the Luhn Algorithm in Titanium

The Luhn algorithm or “mod 10” algorithm, is a checksum used to validate a variety of identification numbers including those used by most credit card vendors.

It was created by IBM scientist Hans Peter Luhn and described in U.S. Patent No. 2,950,048, filed on January 6, 1954, and granted on August 23, 1960.  This is a pretty interesting algorithm as algorithms go and I would recommend checking it out on Wikipedia.

The following demonstrates how you can a CommonJS module implementation of this algorithm in your Titanium app.

Before we can get started, we need to generate a few fake credit card numbers for testing. For this demonstration I used the site “Get Credit Card Numbers”.  This site provided us with the fake number we use in all of our examples.

Credit Card Helper CommonJS Module

First we create our module using the below code.  This module has one function called verifyCardWithLuhn that has one parameter for you to pass in the credit card number you wish to validate.  This function will return true if the provided credit card number is in the correct format, or false if the format is invalid.


exports.verifyCardWithLuhn=function(cardNumber){
  //Remove spaces
	cardNumber = cardNumber.replace(/[^\d]/g, "");
	//Grab our length for use later
	var cardLength = cardNumber.length;
	//If no length return invalid
	if (cardLength === 0){
		return false;
	}
	//Get last digit
    var lastDigit = parseInt(cardNumber.substring((cardLength-1),cardLength),10);
    //Build string with all credit card digits minus the last one
    var cardNumberMinusLastDigit = cardNumber.substring(0,(cardLength-1));
    //Build up our variables needed for our calculation
    var sum = 0, luhnLength = cardNumberMinusLastDigit.length, luhnKey = [0,1,2,3,4,-4,-3,-2,-1,0];

    //Step 1 of our hash add the numbers together
    for (i=0; i<luhnLength; i++ ) {
      sum += parseInt(cardNumberMinusLastDigit.substring(i,i+1),10);
    }
    //Step 2 of our has, we now add in our key values
    for (i=luhnLength-1; i>=0; i-=2 ) {
  	  sum += luhnKey[parseInt(cardNumberMinusLastDigit.substring(i,i+1),10)]
    }

    //Adjust our sum as neeed
   	var mod10 = sum % 10;
   	mod10 = 10 - mod10;
   	if (mod10===10) {
    	mod10=0;
   	}

    //Our hash should now mast the last digit of our number
  	return (mod10===lastDigit);
};

See the gist here.

Calling our Module

Calling our Credit Card Helper module is easy. We simply use the require method to add the CommonJS module into our project.


var my = {tools:{}};
//Import our module into our project
my.tools.cardHelper = require('credit_card_helper');
//Our test credit card number that we got from http://www.getcreditcardnumbers.com/
var testCreditCardNumber ="49713268648235453";
//Call our verify method to check if our credit card number is in a correct format
var ccCheck = my.tools.cardHelper.verifyCardWithLuhn(testCreditCardNumber);
//alert the result back to the user
alert(ccCheck);

See the gist here.

Things to reminder

Please remember this algorithm can only validate if the format is correct.  You will still need to use a 3rd party service to determine if the number itself is active and valid.

Review : Augmented Reality using Appcelerator Titanium Starter

book_reviewOver the holidays I had a chance to read Trevor’s new book “Augmented Reality using Appcelerator Titanium Starter“.   Although I was a technical reviewer this was my first chance to read the completed book cover to cover.
This book is a must have for any Titanium developer looking to explore
Augmented Reality.  If you are just getting started with Titanium this book has a ton of recipes to help get you started.

My favorite section was the discussion on how to handle the views which draw the different location elements.  This is a fresh approach on handling performance issues often related to rapidly moving views.  Just as interesting was the discussions related to the different location algorithms.  Even experienced Titanium developers will find new useful snippets to take away from the author’s code.

If you are new to Titanium development you might want to check out Appcelerator’s Getting Started Guides first, as the author focuses his time on discussing the complexities of the augmentedTi app instead of setup topics.

To learn more about this book please visit the below:

The augmentedTi open source app can be found at the link below:

Creating Keyboard Shortcuts for Switching Tabs in Titanium Studio

I’ve been using Titanium Studio quite a bit lately and noticed the default key mappings for switching tabs was not working for me.  Titanium Studio allows you to easily set your key bindings to anything.

Below are the steps I used to create my tab switching shortcuts.

Where is Key Mapping Preferences?

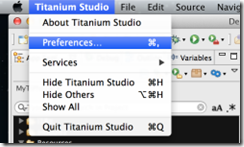
You can updated Titanium Studio’s key bindings by going to Titanium Studio then selecting the Preferences option as shown below.

PreferencesOption

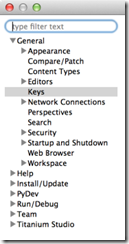
Titanium Studio provides a large amount of preferences, you can tailor almost anything to your workflow.  The key binds are found under General then Keys.  If you have trouble finding this, just search for “keys” in the filter box.

PreferenceKeyOption

Mapping Next Tab

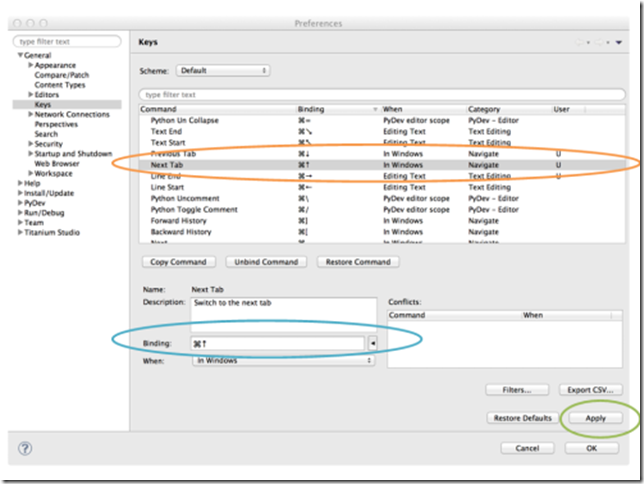
Once in the Keys option menu, scroll until you see “Next Tab”, you can also filter by “tab” and it will help you find this option.  Select the “Next Tab” as shown in orange below. Then enter “Command Page Up” in the binding section highlighted in blue. Once completed you will need to press the “Apply” button for this option to be immediately available in Titanium Studio.

NextTab

Mapping Previous Tab

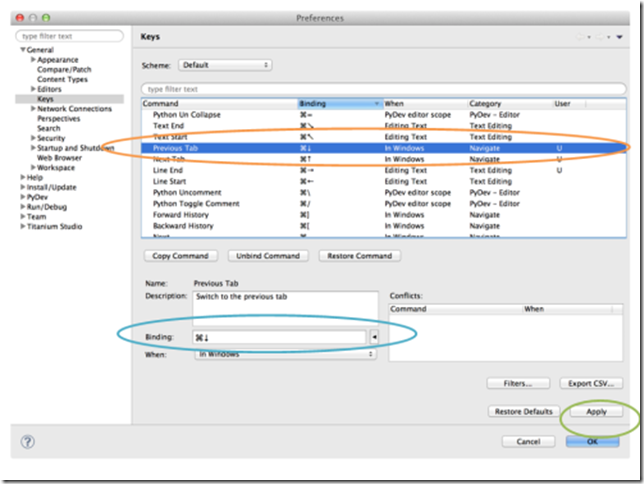
Once in the Keys option menu, scroll until you see “Previous Tab”, you can also filter by “tab” and it will help you find this option.  Select the “Previous Tab” as shown in orange below. Then enter “Command Page Down” in the binding section highlighted in blue. Once completed you will need to press the “Apply” button for this option to be immediately available in Titanium Studio.

PreviousTab

Shortcuts in Action…

Now I can switch between tabs just like in my Eclipse projects.

Moving to the Next Tab

Tab1Selected

CMD  jean_victor_balin_add_blue  UAK

Tab2Selected

Moving to Previous Tab

Tab2Selected

CMD  jean_victor_balin_add_blue  DAK

Tab1Selected

Changing a Titanium iOS Module’s GUID

Occasionally you will need to a module’s GUID.  This is commonly done to avoid licensing conflicts with open source modules.

Updating a module’s GUID is a straight forward and simple process.  The below steps demonstrate how to change the GUID in your Titanium iOS custom module.

Before getting started it is important to note that Appcelerator doesn’t support updating your module’s GUIDs so please make a back-up of your original files just in case.

Generate a new GUID

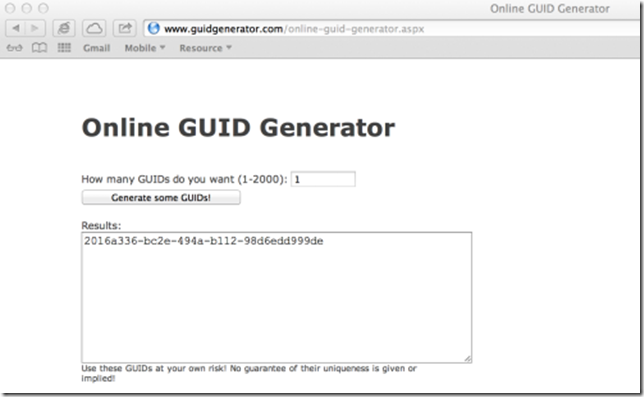
The first step is to generate a new GUID.  I like to use GuidGenerator.com. Using this site we generate a GUID of 2016a336-bc2-494a-b112-98d6edd999de that we will us to update our Xcode module project.

guidgenerator

Updating the Manifest File

When you create a Titanium Module project, a manifest file is automatically created for you.  This file contains your project name, version information, module id, and your module’s GUID.

The manifest file is located in the root of your Xcode project, as shown below.

manifest_file

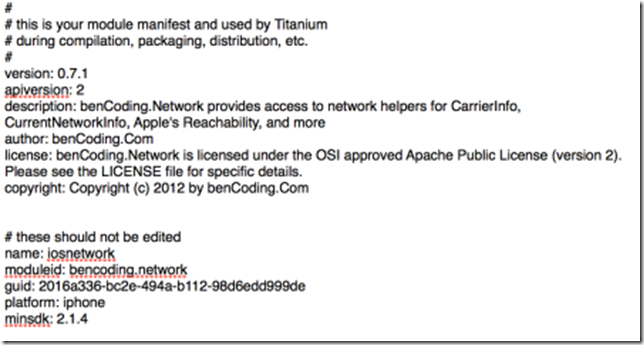
Open this file in your favorite text editor and change the existing GUID to the new one generated by GuidGenerator.com.  In our case the manifest should now look like the below.


manifest_guid_update

Updating your Xcode Project

The next step is to update your module’s moduleId method.  This is located in the <Your Module Name>Module.m file of your project. In this example our module is called BencodingNetwork, so we will want to look in the BencodingNetworkModule.m project file.

finding_class

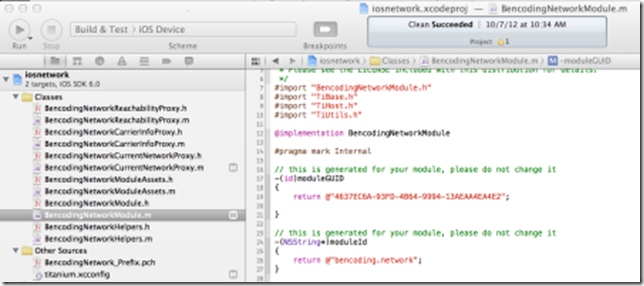
You will want to open this class file in Xcode and update the moduleGUID property.  You simply update the return value with the same GUID used in updating our manifest file.

xcode_update

Almost done, one last step

Now that you’ve updated your module’s GUID you will need to re-build your module.  To do this open terminal in the root of your module’s folder and run the ./build.py script as shown below.  This will generate a new compile module zip for you to use in your Titanium projects.

termina

Opening Custom Url Schemas with Titanium

Apple’s iOS implements a custom URL scheme is a mechanism through which third-party apps can communicate with each other.  This allows your app to launch other apps.

Using this powerful iOS feature is simple, just provide the app’s url to the Titanium.Platform.openURL method.

List of Custom Url Schemes Resources

The most challenging part of using Custom Url Schemes is finding available url’s to call.  Several new services have been released to meet this need.  Below is a few of the most comprehensive resources I have found.  Unfortunately many of the examples only show the top level Url without detailed functionality mapping.

Custom Url Examples:

Using the Custom Url Scheme resources discussed above you can quickly integrate with a wide variety of services using the same implementation pattern as shown below.  The below  are a few examples showing how you can use custom urls within your Titanium app.

FaceTime:

//Make a facetime call

var url = "facetime://1234567890";
if (Titanium.Platform.canOpenURL(url)) {
    Titanium.Platform.openURL(url);
}
else {
    alert('Cannot open app');
}

iBooks:

//Open an iBook from the App Store

var url = "itms-books://itunes.apple.com/us/book/the-zombie-survival-guide/id419952002";
if (Titanium.Platform.canOpenURL(url)) {
    Titanium.Platform.openURL(url);
}
else {
    alert('Cannot open app');
}

Facebook:

//Open the facebook app to the friends section

var url = "fb://friends";
if (Titanium.Platform.canOpenURL(url)) {
    Titanium.Platform.openURL(url);
}
else {
    alert('Cannot open app');
}

More Resources

OneTok Android Titanium Module

I am happy to announce the Ti.OneTok module for Android.  This joins the iOS module created a few months ago.

The Module

The Ti.OneTok module provides a wrapper around the OneTok SDK allowing you to call it from your Titanium Project.  The Ti.OneTok module is available for download from the github project.

The Code

The complete code, documentation, and example app.js is available for download on github

AndroidModule, Documentation, and example

iOSModule, Documentation, and example

Ti.OneTok is available under the Apache 2 license so feel free to fork, extended, and contribute.

The Example

function startRecording(){
    var oneTokOutput = [];

    //This method is called on error
    function onError(e){
        Ti.API.info(e);
        alert('Errored while recording');
    };

    //This method is called as OneTok processes your
    //speak results. This will be called several times before finish
    function onResults(e){
        Ti.API.info("results=" + JSON.stringify(e));
        //We add the pending results to be used later.
        oneTokOutput.push(e);
        //You can check the result_type to determine if
        //a valid result has been returned
        if(e.result_type=='valid'){
            Ti.API.info("Valid Results=" + JSON.stringify(e));
        }
    };

    //This method is called when the recording session has finished
    function onFinish(e){
        alert('Recording Completed');
        Ti.API.info(JSON.stringify(oneTokOutput));
    };

    if(!Ti.Network.online){
        alert("I'm sorry a network connection is needed to use this module");
    }else{
        oneTokSession.startRecording({
                onResults:onResults, //Add callback to process results, called many times
                onError:onError, //Add callback to handle error messages
                onFinish:onFinish  //Add callback to handle when recording has finished
        });
    }
};

Titanium MapView ImageOverlays, TileOverlays, GeoJSON and More

I’m happy to announce the latest release of the benCoding.MapView module.

This is a big release that provides support for the following:

In addition to the above features the module’s memory footprint has greatly been reduced.

The module is fully documented with samples demonstrating how to use each feature.  To learn more please visit our module documentation here.

What to see more of the module in action?  The module’s samples has been updated with videos highlighting many of the advanced features of the MapView module.  Please visit the our showcase  to view the demos in action.

A special thanks to Jeff Bonnes (@jeffbonnes) for contributing TileOverlay support.

New Features In Action

Here are a few of the new features in action.


Supporting Different orientationModes in your Universal iOS App

Recently I had a requirement to create a universal app that supported different orientation modes for iPhone and iPad. 

There are two key points to implementing a universal app that support different orientations by device.

  1. Explicitly define your launch orientations in your tiapp.xml for both iPhone and iPad
  2. On Window create explicitly set the orientation mode property.

Setting iPhone and iPad Launch Orientations

By configuring your orientation modes in your tiapp.xml tells the app what orientations are supported when the app is loading and your splash screen is active.  Since Titanium 2.0 you have the ability to set the orientation modes using info.plist format as shown below.

  1. Add the UISupportedInterfaceOrientations node as shown below. This specifies the orientation mode used by the iPhone.
  2. Add the UISupportedInterfaceOrientations~ipad node as shown below. This specifies the orientation mode the iPad will use.

If you do not add the iPad orientation node(UISupportedInterfaceOrientations~ipad) your app will use the UISupportedInterfaceOrientations settings to determine default orientation behavior.

The example below shows setting the launch orientations for the iPhone to Portrait and the iPad to both Portrait and Landscape.

<?xml version="1.0" encoding="UTF-8"?>
<ti:app xmlns:ti="http://ti.appcelerator.org">
    <deployment-targets>
        <target device="mobileweb">false</target>
        <target device="iphone">true</target>
        <target device="ipad">true</target>
        <target device="android">false</target>
        <target device="blackberry">false</target>
    </deployment-targets>
    <ios>
        <plist>
            <dict>
                <key>UISupportedInterfaceOrientations</key>
                <array>
                    <string>UIInterfaceOrientationPortrait</string>
                    <string>UIInterfaceOrientationPortraitUpsideDown</string>
                </array>
                <key>UISupportedInterfaceOrientations~ipad</key>
                <array>
                    <string>UIInterfaceOrientationPortrait</string>
                    <string>UIInterfaceOrientationPortraitUpsideDown</string>
                    <string>UIInterfaceOrientationLandscapeLeft</string>
                    <string>UIInterfaceOrientationLandscapeRight</string>
                </array>
            </dict>
        </plist>
    </ios>
</ti:app>

For more information please reference the iOS Specific Section documentation here.

Creating Windows with Explicit Orientations

It is a best practice to always set the orientations you wish to support on Window creation.

Below is a helper function and sample I use when creating all of my windows.  This can also be helpful for setting a common backgroundColor, or other setting.

1. CommonJS Helper ( file called helper.js)

var _isPhone = (Ti.Platform.osname == "iphone");
exports.makeWindow=function(a){
    a = a || {};
    var win = Ti.UI.createWindow(a);
    if(_isPhone){
            win.orientationModes = [
                Ti.UI.PORTRAIT,
                Ti.UI.UPSIDE_PORTRAIT
            ];  
    }else{
            win.orientationModes = [
                Ti.UI.PORTRAIT,
                Ti.UI.UPSIDE_PORTRAIT,
                Ti.UI.LANDSCAPE_LEFT,
                Ti.UI.LANDSCAPE_RIGHT
            ];  
    }

    return win; 
};

2. Sample Window Creation (app.js)

var helpers = require('helpers');
var winConfig = {
        title:"Foo", backgroundColor:'#fff', tabBarHidden:true, barColor:'#000
};
var win = helpers.makeWindow(winConfig);
var testLabel = Ti.UI.createLabel({
        text:"this is a test, turn the device to see if it worked", 
        color:"#000", top:40, left:25, right:25, height:60,
        textAlign:"center", font:{fontSize:12}
});
win.add(testLabel);
win.open();

For more information about window orientation please see the documentation here.

Setting the Minimum iOS Version for your Titanium Project

With Appcelerator’s release of Titanium SDK 2.1.2 you can now specify the minimum iOS version in your tiapp.xml file.  This is a big step forward in managing all of your cross platform configurations in one file.  For me this has removed the latest need for a custom plist,

Just add the min-ios-ver node to the ios configuration section in your project’s tiapp.xml.  The below example sets a minimum iOS SDK level to 5.0.

<ios>
    <min-ios-ver>5.0</min-ios-ver>
    <plist>
        <dict>
            <key>UIPrerenderedIcon</key>
            <true/>
            <key>UIStatusBarStyle</key>
            <string>UIStatusBarStyleBlackTranslucent</string>
            <key>UISupportedInterfaceOrientations</key>
            <array>
                <string>UIInterfaceOrientationPortrait</string>
                <string>UIInterfaceOrientationPortraitUpsideDown</string>
            </array>
        </dict>
    </plist>
</ios>

This has streamlined the deployment process for me both via Titanium Studio and Transport.py.